Last updated: September 23, 2026
This guide combines decades of field experience with modern troubleshooting practices that have successfully helped many of our customers.
2026 TROUBLESHOOTING GUIDE INDEX
- Before you start troubleshooting
- Checking Differential Pressure
- Why is my airflow at the pickup point lower than normal?
- What can I do if dust is settling inside the ductwork?
- What should I do if my compressed air consumption is excessive?
- How to prevent dust from escaping from the stack?
- What can I do if I have moisture inside my dust collector?
- Troubleshooting by dust collector type:
- Dust Collector Troubleshooting Quick Reference
Whenever a customer calls us because “the dust collector isn’t working,” our first response is usually another question: “What exactly is the system doing?.” Rather than immediately looking at the filters, start by identifying the symptom.
Most dust collection problems fall into one of these categories:
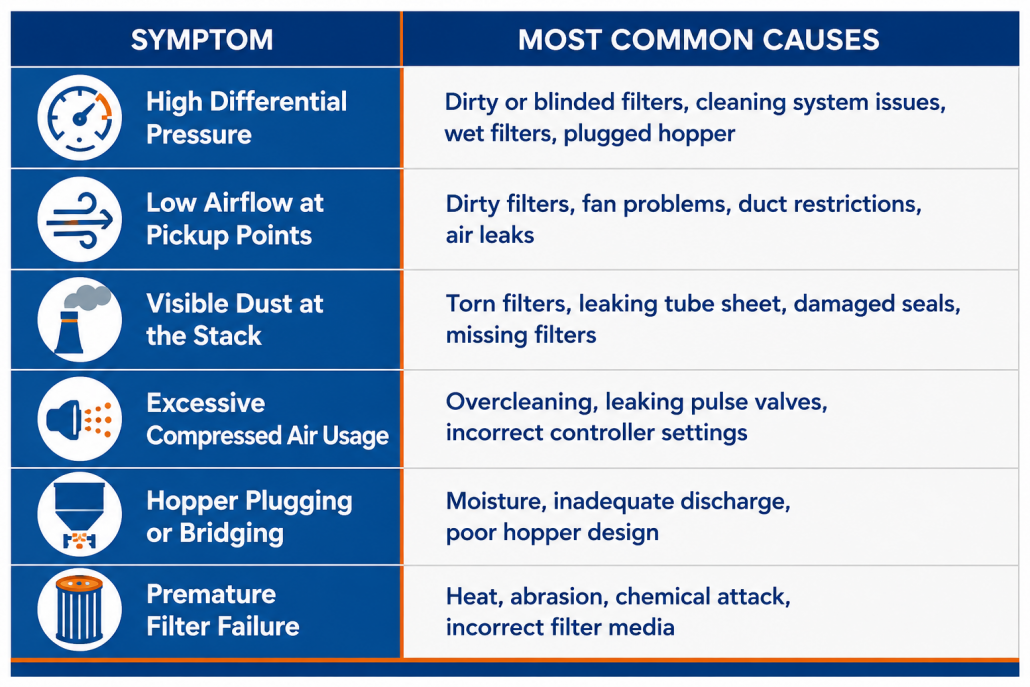
If there is one measurement every maintenance technician should understand, it’s differential pressure.

Así como la presión arterial indica la salud y eficiencia del sistema circulatorio, la presión diferencial ofrece una medición vital de qué tan bien está funcionando el colector de polvo.
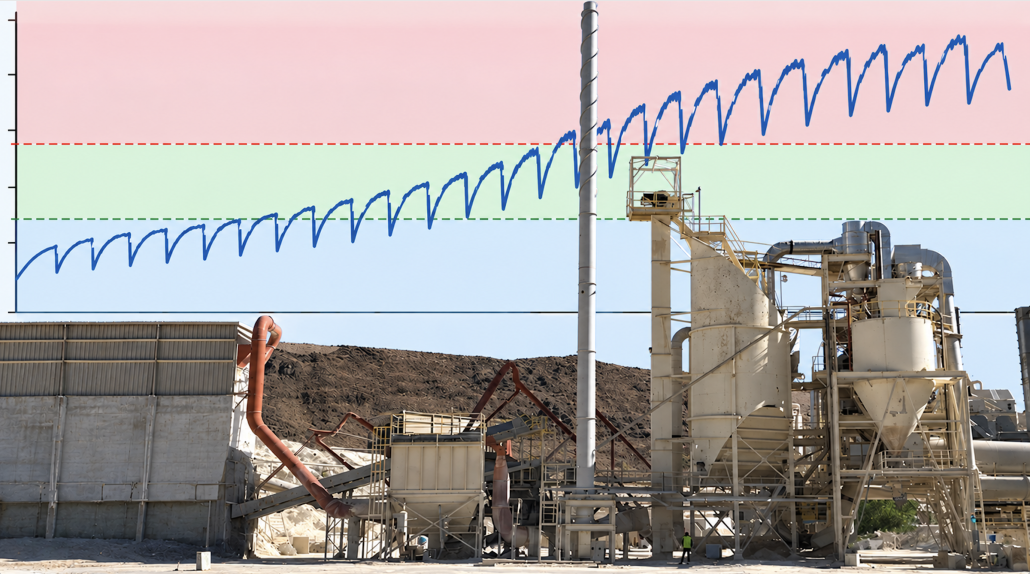
Presión diferencial (often called DP) measures the resistance to airflow across the filters. As dust accumulates on the surface of the filters, airflow becomes more difficult, causing the differential pressure to increase. After the cleaning system pulses the filters, the dust cake is partially removed and the differential pressure decreases.
This continual rise and fall is perfectly normal. In fact, a dust collector operating with some filter cake generally filters better than one with perfectly clean filters.
The important question you should ask yourself is: “How is the differential pressure changing over time?” The trend often reveals far more than a single reading ever could.
Understanding Differential Pressure Trends
The table below provides a quick reference for interpreting common differential pressure conditions.

A high differential pressure means the fan is working harder to pull air through the collector. As resistance increases, airflow usually decreases, reducing dust capture at the process equipment.
Before ordering replacement filters, work through the following 4-step checklist.
Step 1: Verify the Reading
Believe it or not, the differential pressure gauge itself is frequently the problem.

Si los operadores tienen lecturas incorrectas, podría resultar en daños al sistema, un aumento de las emisiones o incluso en riesgos de incendio y polvo combustible
Inspect the following:
- ⦿ Are the pressure sensing tubes plugged with dust?
- ⦿ Is there moisture inside the tubing?
- ⦿ Is the differential pressure transmitter calibrated correctly?
- ⦿ Is the Magnehelic gauge functioning normally?
- ⦿ Are both pressure taps connected properly?
Many apparent “filter problems” disappear after cleaning the pressure sensing lines.
Step 2: Has the Cleaning System Stopped Working?
If differential pressure continues climbing even after cleaning cycles occur, inspect the cleaning system.
Depending on your collector, check:
- ⦿ Pulse valves
- ⦿ Solenoid valves
- ⦿ Diaphragms
- ⦿ Compressed air pressure
- ⦿ Pulse controller
- ⦿ Timer settings
- ⦿ Clean-on-demand controller
- ⦿ Reverse-air fan
- ⦿ Shaker mechanism
One failed pulse valve can affect dozens of filters. Several failed valves can quickly cause differential pressure to rise throughout the entire collector.
Step 3: Are the Filters Wet?
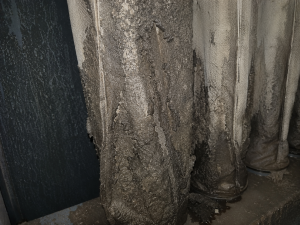
Primer plano de filtros de un colector de polvo cegados por la humedad y la acumulación de polvo provocadas por la condensación dentro del sistema.
Cuando condensation forms inside a dust collector, dust begins sticking to the filter media instead of releasing during cleaning, and eventually, the filters become blinded.
Unlike ordinary dust cake, blinded filters contain embedded dust deep within the filter media. Since the cleaning system only removes dust from the surface, embedded particles remain trapped inside the fabric.
Once blinding reaches this stage, filter replacement is usually the only permanent solution. Identify why moisture entered the collector first.
Moisture common causes are:
- ⦿ Process temperatures falling below the dew point
- ⦿ Cold start-ups
- ⦿ Poor insulation
- ⦿ Ambient air entering through leaks
- ⦿ Wet compressed air
- ⦿ Process moisture
Step 4: Have the Filters Simply Reached the End of Their Life?
Typical signs include:
- ⦿ Differential pressure continues increasing year after year.
- ⦿ Cleaning pulses no longer reduce differential pressure.
- ⦿ Airflow gradually decreases.
- ⦿ Production begins suffering despite proper maintenance.
At this stage, replacing the filters is usually the correct decision.
Operators may notice dust escaping around hoods, material accumulating on equipment, or housekeeping becoming more difficult than usual.
Low airflow can originate anywhere between the pickup hood and the exhaust stack, which is why it’s important to troubleshoot the entire system.
Step 1: Verify That the Fan Is Operating Properly
Check the following:
- ⦿ Is the motor operating normally?
- ⦿ Is the motor drawing the expected amperage?
- ⦿ Is the fan rotating in the correct direction?
- ⦿ Has the fan speed changed?
- ⦿ Are all drive belts properly tensioned?
- ⦿ Is the Variable Frequency Drive (VFD), if equipped, operating at the intended speed?
It’s surprisingly common to find fans operating below their design speed because of VFD programming changes, slipping belts, incorrect pulley ratios, or motor wiring issues.
Step 2: Inspect the Fan for Wear or Material Buildup
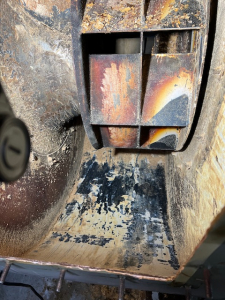 Fans operating in dusty environments gradually accumulate material on the impeller. This buildup creates two problems.
- ⦿ First, it changes the shape of the fan blades, reducing efficiency.
- ⦿ Second, it often causes the impeller to become unbalanced, producing excessive vibration that shortens bearing life and increases maintenance costs.
Inspect for:
- ⦿ Dust buildup on the impeller
- ⦿ Worn fan blades
- ⦿ Corrosion
- ⦿ Cracks
- ⦿ Excessive vibration
- ⦿ Bearing noise
Step 3: Look for Restrictions in the Ductwork

Maintaining the minimum conveying velocity in the dust collection system prevents dust drop out and build up inside the ductwork
Common examples include:
- ⦿ Product buildup inside ducts
- ⦿ Plugged branch lines
- ⦿ Collapsed flexible duct
- ⦿ Closed or partially closed blast gates
- ⦿ Damaged duct sections
- ⦿ Excessive dust accumulation after years of operation
Even partial obstructions increase static pressure and reduce airflow at downstream pickup points. In systems handling sticky, moist, or fibrous materials, product buildup inside horizontal duct runs is especially common.
Step 4: Check for Air Leaks
Inspect:
- ⦿ Puertas de acceso
- ⦿ Inspection ports
- ⦿ Expansion joints
- ⦿ Flexible connectors
- ⦿ Flanges
- ⦿ Gaskets
Leaks downstream of the filters may not reduce airflow significantly, but they can affect system balance and make troubleshooting more difficult.
When duct velocity falls below the minimum conveying velocity required for the material being collected, particles begin settling inside the ductwork. This is called product dropout.
What Causes Product Dropout?
The most common causes include:
- ⦿ Fan operating below design airflow
- ⦿ Oversized ductwork
- ⦿ System modifications that reduce velocity
- ⦿ Additional pickup points added after installation
- ⦿ Heavy or abrasive material requiring higher conveying velocity
- ⦿ Excessive dust loading
Larger ductwork does not always improve airflow. In reality, increasing duct diameter without increasing airflow lowers air velocity. Eventually, the velocity drops below the minimum needed to keep particles suspended.
What Should You Check?
Inspect areas where dust tends to settle first:
- ⦿ Horizontal duct runs
- ⦿ Long-radius elbows
- ⦿ Branch connections
- ⦿ Low spots
- ⦿ Dead-end sections
If material is accumulating repeatedly in the same location, the ductwork design itself may need to be evaluated.
Check the Cleaning Controller
Many older systems clean continuously on a fixed timer. This means the collector pulses whether the filters need cleaning or not. Modern clean-on-demand controllers monitor differential pressure and pulse only when necessary.
Facilities upgrading from timer-based cleaning frequently reduce compressed air usage while extending filter life.
📖 Lee también: La importancia de la presión correcta de aire comprimido en un colector de polvo pulse-jet
Inspect Pulse Valves
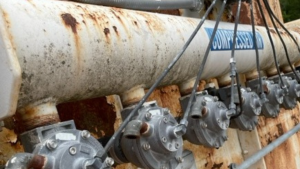 A leaking diaphragm valve may continue bleeding compressed air even when it’s not pulsing.
Symptoms include:
- ⦿ Compressor running more often
- ⦿ Lower manifold pressure
- ⦿ Continuous air leakage
- ⦿ Weak cleaning pulses
Inspect every pulse valve, diaphragm, and solenoid. One leaking valve can waste thousands of cubic feet of compressed air every day.
Verify Compressed Air Quality
Cleaning systems require clean, dry compressed air.
Moisture inside compressed air lines can:
- ⦿ Damage solenoid valves
- ⦿ Freeze during cold weather
- ⦿ Cause pulse valves to malfunction
- ⦿ Introduce water into the dust collector
What Can You Do?
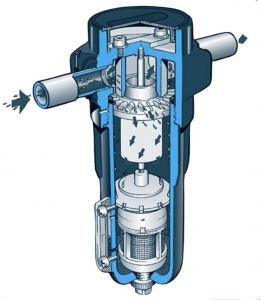
Install a compressed air moisture trap (or water separator) to remove liquid condensation from air lines. It protects solenoid valves, diaphragm valves, and filters from rust or moisture damage.
📖 Lee también: The Importance of Dry and Clean Compressed Air in a Pulse Jet Dust Collector
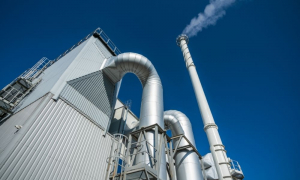
Occasionally, small amounts of particulate may be visible during startup or process upsets; but a properly operating dust collector should not continuously release visible dust. If emissions suddenly increase, the problem should be investigated immediately.
The first step is determining whether the dust is bypassing the filters or passing through them. Those are two very different problems with very different solutions.
Step 1: Inspect the Filter Bags
Inspect several bags from different locations throughout the collector for:
- ⦿ Holes or tears
- ⦿ Burn marks
- ⦿ Abrasion near the cage wires
- ⦿ Chemical degradation
- ⦿ Broken snap bands or clamps
- ⦿ Improper seating in the tubesheet
If only a few bags have failed due to an isolated issue, replacing those individual filters may be appropriate. However, if filters are reaching the end of their normal service life throughout the collector, replacing the complete set is usually the better long-term solution.
Lee nuestro artículo titulado: Should I Change All My Filter Bags at Once or Just Spot Change as Needed?
Step 2: Check the Tubesheet and Sealing Surfaces
Any opening around filter mounting holes, access doors, inspection hatches, or welded seams allows dirty air to bypass the filters completely.
Inspect for:
- ⦿ Damaged filter seals
- ⦿ Missing or improperly installed filters
- ⦿ Worn gaskets
- ⦿ Cracked welds
- ⦿ Corrosion around the tubesheet
- ⦿ Leaking access doors
Step 3: Consider Filter Blinding
Filter blinding is a normal end-of-life failure rather than a mechanical failure.
Common signs include:
- ⦿ Alta presión diferencial.
- ⦿ Cleaning pulses no longer reducing pressure
- ⦿ Gradually increasing emissions
- ⦿ Reducción del flujo de aire.
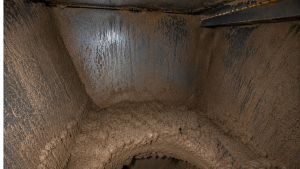
Moisture inside a dust collector hopper can cause fine dust to become sticky and form large bridges over the hopper outlet. This prevents proper material discharge, increases differential pressure, and can eventually lead to hopper plugging, filter blinding, and reduced dust collector performance.
When warm process gas cools below its dew point, water vapor condenses inside the collector. Once water reaches the filters, dust begins sticking to the media instead of releasing during cleaning.
Common causes include:
- ⦿ Cold startups
- ⦿ Poor insulation
- ⦿ Air leaks introducing cold ambient air
- ⦿ Wet compressed air
- ⦿ Process changes
- ⦿ Low operating temperatures
📖 Lee también: Cómo prevenir la condensación en tu colector de polvo
The following sections highlight the most common issues encountered with the four primary dust collector designs used in industry today.
 Pulse-Jet Dust Collectors
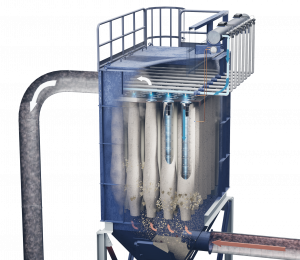 Pulse-Jet Dust Collectors
When troubleshooting a pulse-jet collector, the cleaning system should always be one of the first areas inspected.
Common Problems
The Filters Aren’t Cleaning Properly
A pulse-jet cleaning system depends on a short, powerful burst of compressed air. If that pulse becomes weak, filter performance declines rapidly.
Inspect:
- ⦿ Compressed air pressure
- ⦿ Pulse controller settings
- ⦿ Solenoid valves
- ⦿ Diaphragm valves
- ⦿ Blow pipes
- ⦿ Venturis
- ⦿ Pulse timing
- ⦿ Air manifold pressure
The Collector Is Pulsing Too Frequently
Excessive pulsing:
- ⦿ Wastes compressed air
- ⦿ Shortens filter life
- ⦿ Increases maintenance costs
- ⦿ Prevents a stable dust cake from forming
Whenever possible, use a differential pressure controller or clean-on-demand system instead of a fixed timer. These systems pulse only when cleaning is actually needed, reducing both compressed air consumption and unnecessary filter wear.
Compressed Air Pressure Is Too Low
Possible causes include:
- ⦿ Air compressor problems
- ⦿ Leaking diaphragm valves
- ⦿ Fugas de aire.
- ⦿ Moisture in the compressed air system
- ⦿ Undersized compressed air piping
Always verify compressed air pressure before assuming the filters have failed.
📖 Lee también: Troubleshooting Your Dust Collector Pulse Jet Cleaning System
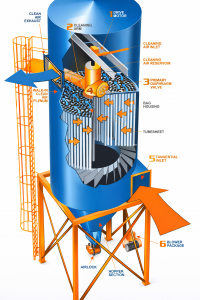
Colector de polvo reverse air rotatorio de baja/media presión
Reverse-Air Dust Collectors
Reverse-air collectors clean the filters by reversing airflow rather than using compressed air.
Common Problems
Reverse-Air Fan Isn’t Operating Properly
Inspect:
- ⦿ Fan rotation
- ⦿ Belt condition
- ⦿ Bearings
- ⦿ Motor amperage
- ⦿ Airflow
Without adequate reverse airflow, filters cannot release accumulated dust effectively.
Isolation Dampers Fail to Seal
Reverse-air collectors depend on isolating one compartment while cleaning. If isolation dampers leak, process airflow continues passing through the filters during cleaning, reducing cleaning effectiveness.
Inspect:
- ⦿ Damper seals
- ⦿ Linkages
- ⦿ Pneumatic actuators
- ⦿ Position indicators
📖 Lee también: ¿Cuál es la diferencia entre los colectores de polvo de aire reverso y los pulse-jet?
Shaker Dust Collectors

Shaker baghouse mechanism
Their cleaning system is mechanically simple but depends heavily on proper adjustment.
Common Problems
Bags Don’t Shake Properly
Inspect:
- ⦿ Bearings
- ⦿ Linkages
- ⦿ Drive components
- ⦿ Shaker motor
- ⦿ Mechanical wear
Insufficient shaking leaves excessive dust on the filters. Excessive shaking shortens filter life.
Filter Bag Tension Is Incorrect
Shaker collectors require properly tensioned bags. Loose bags clean poorly, whereas over-tightened bags experience unnecessary mechanical stress and premature failure.
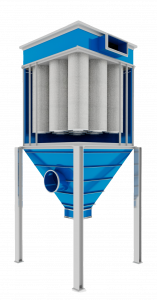
Vertical Cartridge Collector
Colectores con cartuchos
Colectores de cartucho have become increasingly popular for lighter applications, like welding, laser cutting, pharmaceutical manufacturing and food processing.
Common Problems
Pleats Become Packed with Dust
Sticky materials, moisture, or fibrous dust may become lodged between their pleats, preventing proper cleaning.
Possible causes include:
- ⦿ High humidity
- ⦿ Oil mist
- ⦿ Incorrect filter media
- ⦿ Overcleaning
- ⦿ Inadequate compressed air pressure
Filters Load Unevenly
Uneven loading often indicates poor airflow distribution inside the collector.
Inspect:
- ⦿ Inlet design
- ⦿ Baffles
- ⦿ Air distribution plates
- ⦿ Damaged cartridges
- ⦿ Missing gaskets

Facilities that achieve the best reliability are the ones that identify these small changes early, before they become expensive repairs.
Don’t immediately replace filters or adjust timer settings; approach troubleshooting methodically. Start with the symptom, verify your measurements, inspect the simplest components first, and work systematically toward the root cause. In many cases, the solution turns out to be much simpler…and far less expensive than it first appears.

Systems Engineer & Baghouse Expert
Dave Dal Santo, is the Director of Operations at Baghouse.com and has been helping industrial facilities solve complex dust collection challenges since the company’s founding four decades ago. Throughout his career, he has led hundreds of baghouse installations, emergency repairs, system retrofits, and maintenance projects across North America, earning a reputation for solving difficult problems under demanding conditions.