Las fugas internas en los filtros son una de las razones más comunes por las que un colector de polvo empieza a emitir polvo hacia la chimenea, perder eficiencia o generar suciedad en el lado de aire limpio del sistema. El problema es que muchas fugas no son fáciles de ver a simple vista. A menos que haya un desgarre importante, un filtro faltante o un anillo superior mal asentado, una inspección visual por sí sola quizás no sea suficiente para detectar la verdadera fuente del problema.
Ahí es donde el polvo fluorescente para detección de fugas y la inspección con luz ultravioleta se vuelven extremadamente útiles. Este método les da a los equipos de mantenimiento una forma rápida y confiable de identificar filtros con fugas, sellos deficientes, errores de instalación y otras rutas de fuga internas. También es una de las mejores herramientas para incluir en un programa preventivo de mantenimiento trimestral regular, especialmente en colectores de polvo pulse-jet.
Por qué funciona este método de prueba de fugas
Realizar pruebas de fugas puede prevenir considerables gastos y tiempo desperdiciado de operaciones.
El polvo fluorescente para detección de fugas se introduce en el lado de aire sucio del colector de polvo. A medida que se mueve a través del sistema, se comporta como el polvo del proceso. Si existe una ruta de fuga, como un agujero en un filtro, una costura dañada, un mal sello en el anillo superior o un filtro que no está bien asentado, el polvo sigue esa ruta hacia el lado de aire limpio.
Una vez que el colector se apaga y se inspecciona el lado de aire limpio con una luz UV negra, el polvo de detección de fugas se vuelve muy visible. En lugar de adivinar qué filtro tiene fuga, el equipo de mantenimiento puede ver exactamente por dónde pasó el polvo.
Esto es mucho más confiable que tratar de encontrar agujeros visualmente, especialmente cuando la fuga es pequeña.
¿Con cuánta frecuencia debería realizar una prueba de fugas?
La prueba de fugas no es solo para filtros viejos que han estado en servicio durante mucho tiempo. También debe usarse en varias situaciones rutinarias y correctivas.
Una prueba de fugas es especialmente valiosa:
⦿ Cuando se ve polvo saliendo de la chimenea
⦿ Durante inspecciones trimestrales de mantenimiento preventivo
⦿ Después de un cambio de filtros
⦿ Después de poner en operación mangas o cartuchos instalados por contratistas
⦿ Cuando las emisiones aumentan de forma inesperada
⦿ Cuando mantenimiento sospecha una fuga, pero no puede identificarla solo con inspección visual
Uno de los usos más prácticos de este método es inmediatamente después de un cambio de filtros. Un colector puede verse bien por fuera, pero si aunque sea unos cuantos filtros no quedaron correctamente colocados, la prueba de fugas lo mostrará antes de que la unidad vuelva a estar operativa.
¿Qué herramientas necesito para hacer una prueba de fugas?
Para realizar correctamente esta inspección, el equipo de mantenimiento debe contar con:
⦿ Polvo fluorescente para detección de fugas
⦿ Una luz negra UV de inspección
⦿ Lentes con filtro UV
⦿ Un punto de inyección en el lado de aire sucio del sistema
⦿ Una forma de desactivar el sistema de limpieza
⦿ Una hoja o mapa del colector para documentar las ubicaciones de las fugas
⦿ Suficientes filtros de repuesto en caso de que sea necesario reemplazar filtros dañados
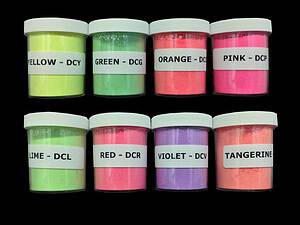
Diferentes aplicaciones requieren colores específicos de polvo fluorescente para la identificación de fugas durante la inspección
El polvo detector de fugas normalmente está disponible en varios colores, lo cual es útil si el colector necesita probarse más de una vez. Usar un segundo color después de las reparaciones facilita confirmar que las fugas originales realmente fueron corregidas.
Una regla general es usar aproximadamente una libra de polvo detector de fugas por cada 1,000 pies cuadrados de área de filtros.
¿Cómo realizar una prueba de fugas? Paso a paso
Paso 1: Identifique el punto de inyección
Elija un puerto de inyección en el lado de presión negativa de la corriente de polvo, lo más cerca posible de la entrada del colector. Esto ayuda a que el polvo viaje a través del colector de la misma manera que lo hace el polvo del proceso.
Paso 2: Apague el sistema de limpieza
Desactive el mecanismo de limpieza del colector, pero mantenga funcionando el ventilador de extracción. Esto es importante porque permite que se forme una torta de polvo sobre los filtros y aumenta la presión diferencial a través del colector. Esa diferencia de presión favorece que el polvo detector se mueva hacia los puntos de menor resistencia, que son precisamente las rutas de fuga que se quieren encontrar.
Paso 3: Inyecte el polvo fluorescente
Introduzca el polvo detector de fugas en la corriente de aire sucio. El polvo se moverá a través del colector y pasará por cualquier agujero, sello deficiente u otro punto de fuga.
Paso 4: Apague el colector
Después de introducir el polvo y dejar que circule a través del sistema, apague el colector.
Paso 5: Entre al lado de aire limpio
Entre al plenum de aire limpio por encima de los filtros. Cierre puertas o bloquee la luz exterior si es necesario para que el área de inspección quede lo más oscura posible.
Paso 6: Inspeccione con luz negra y lentes UV
Use la luz UV y los lentes con filtro para inspeccionar:
⦿ La parte superior de los filtros
⦿ La placa tubular
⦿ Las áreas del anillo superior de los filtros
⦿ Las costuras de los filtros
⦿ Cualquier parte del lado de aire limpio expuesta a la corriente de aire filtrado
Cualquier lugar donde el polvo brille es una ruta de fuga.
Paso 7: Documente todas las fallas
Marque las ubicaciones con fuga en una hoja de registro. Esto es importante para las reparaciones y también para dar seguimiento a fallas repetidas en la misma zona. Si las fugas siguen ocurriendo en una misma sección, eso puede indicar un problema mayor de operación o diseño.
Paso 8: Repare o reemplace los filtros
Si el filtro simplemente no está bien asentado, puede ser posible volver a colocarlo correctamente. Si está roto o la costura está dañada, reemplácelo.
Paso 9: Repita la prueba con un color diferente si es necesario
Después de las reparaciones, realice otra prueba usando un color de polvo distinto. Esto confirma que las fugas desaparecieron y ayuda a diferenciar la nueva prueba de la anterior.
¿Por qué debería incluir una prueba de fugas en mi mantenimiento preventivo?
La prueba de fugas trimestral dentro del mantenimiento preventivo es valiosa porque ayuda a identificar fugas pequeñas antes de que se conviertan en emisiones visibles o en fallas mayores de los filtros. También le da al personal de mantenimiento un procedimiento repetible y confiable para revisar la integridad de los filtros de manera programada.
Qué significan los resultados
Una de las mayores ventajas de este método es que ayuda al equipo a interpretar qué tipo de problema de fuga tiene realmente.
Si ve puntos o rastros brillantes
Esto normalmente significa que hay una fuga localizada, como por ejemplo:
⦿ un filtro roto
⦿ una costura dañada
⦿ un anillo superior mal asentado
⦿ un sello dañado
⦿ un filtro faltante o dañado
En este caso, el polvo tiende a concentrarse en el punto específico de la falla.
Si no ve puntos de fuga evidentes, pero el polvo sigue saliendo por la chimenea
Esto puede significar algo distinto. Si los filtros están severamente cegados, pueden permitir que el polvo pase de manera más uniforme a través de todo el conjunto de filtros en lugar de hacerlo por un agujero evidente. En ese caso, el polvo detector puede no mostrar una ruta de fuga brillante y concentrada porque no existe un solo punto de falla. En cambio, puede que todo el conjunto de filtros esté dejando pasar un poco de polvo.
Conclusión
Detectar fugas internas con polvo fluorescente y luz ultravioleta es uno de los métodos de inspección más prácticos y confiables disponibles para colectores de polvo. Elimina las suposiciones, agiliza el diagnóstico de problemas y les da a los equipos de mantenimiento una forma repetible de verificar la condición de los filtros y la calidad de su instalación.
Para las plantas que quieren tener un mejor control sobre el desempeño de su colector de polvo, la prueba de fugas debe ser una parte estándar del programa de mantenimiento.
Dust Collection Expert, Technical Writer & Editor at Baghouse.com
Andy Biancotti has spent more than two decades working in maintenance, operations, and industrial dust collection, helping facilities improve reliability, safety, and productivity through better maintenance practices and smarter dust collection strategies. As Editor and Marketing Manager at Baghouse.com, Andy combines hands-on industry experience with technical communication, translating complex dust collection concepts into practical, easy-to-understand resources for plant managers, maintenance personnel, engineers, EHS professionals, and operations teams.