Entries by Matt Coughlin

,

From Manual DP Checks to Continuous Monitoring – A Practical Guide

This article provides a simple use-case for the DustIQ predictive maintenance platform, describing how implementing a few sensors to replace manual differential pressure gauges can yield significant savings in man-hours, compliance risk, and up-time for your dust collection system.

There are many such use cases that can be addressed with the same DustIQ platform by simply adding more sensors. The objective here is to highlight the ease of installation and startup, and the rapid ROI for implementing these tools.

Background

Smart plant, digital transformation, IoT… these terms have been used for years to describe a future state of industry where manual inspections, processes, and routine tasks are replaced by connected sensors feeding data from across the facility into a single system that streamlines operations. Everything from tracking inventory to regulating building temperature to predicting equipment failures would ideally be managed through software, reducing labor hours, process interruptions, and compliance issues. As Eric Schummer, CEO of Senzary, often says, “The goal was never just to connect machines, it was to make the data actually useful for the people running the plant.”

In practice, many early technologies struggled to deliver on that promise. Integrating them with legacy IT systems was difficult, departments often lacked alignment, and objectives weren’t always clearly defined. This led to a patchwork of systems and sensors that sometimes created more work instead of less. Operators frequently found that data was trapped behind licensing walls, dashboards were hard to navigate, and installation or configuration required expensive engineering support. As Schummer puts it, “Companies didn’t fail at IoT — IoT failed them, mostly because it wasn’t built with the end user in mind.”

Opportunity

In recent years with the advent of AI-supported software and machine learning algorithms, lower cost and higher power sensors, and focused effort by a handful of providers to address these issues, the dream of the “Smart Plant” is actually quite accessible for most facilities.

Senzary’s DustIQ platform is one such success story. With DustIQ in place as a backbone providing user-friendly dashboards, reporting, and alerts, the user simply needs to add sensors. Senzary offers a huge range of compatible wireless sensors, which transmit data wirelessly via LoRaWAN gateways at the site. Available sensors include fan vibration, environmental monitoring (temperature, humidity, gas and particulate monitoring), air and water flow, room occupancy, and the list goes on. As a single LoRaWAN gateway can serve dozens or hundreds of sensors within a few hundred meter radius, the system can be quickly and cheaply scaled to add processes and sensors to the system once in place.

IoT Predictive software sensors analytics
DustIQ provides real-
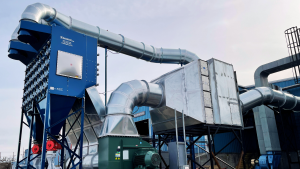
time monitoring of dust levels and
filter performance

Replacing Manual DP Checks

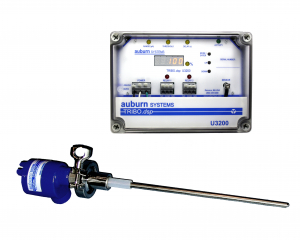
Now to our particular use case. Virtually every air quality permit for a dust collection system in the US requires the site owner to monitor differential pressure across the dust collector filters and take action when the DP exceeds the set limits. Typically this is done with a simple Magnahelic-style analog gauge. To stay compliant, many facilities still send someone out every day to manually check and record the DP on each dust collector. As Matt Coughlin, Owner of Baghouse.com, puts it, “It still amazes me how many plants rely on someone climbing a ladder with a clipboard to check something we can monitor automatically every second.”

Even with photohelic or transmitting DP gauges, where a 4-20mA signal is sent to a control room, the information often ends up buried in spreadsheets or forgotten reports that someone has to manually retrieve to meet compliance requirements.

DustIQ Differential Pressure IoT Sensor
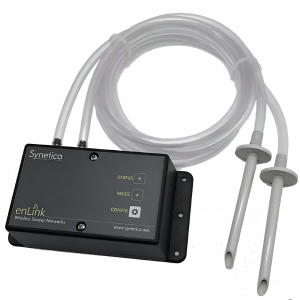
A far easier and more reliable alternative is to install a transmitting sensor — such as the Synetica EnLink offered in the DustIQ platform — directly on the dust collector. The sensor can be installed in minutes and can run on batteries or site power. Once it’s in place and connected to an outdoor LoRaWAN gateway, the DP data updates automatically in the DustIQ dashboard. The dashboard can be configured for simple reporting to show your permit inspector and can generate automated alerts when the DP crosses a threshold or begins trending upward. This gives your team enough warning to schedule filter changes proactively instead of reacting in a panic.

Benefits

  • ✔️ Labor hours reduced

    • 🔵 For a site with 4 dust collectors, an average of 20 hours/month will be saved in manual inspections.
  • ✔️ Reduced shut-downs due to broken/plugged filters

    • 🔵 By tracking DP across time, site maintenance will know well in advance with a filter change will be required, so filter changeouts can be planned around production instead of reactively.
  • ✔️ Safety improvement

    • 🔵 There is no longer any need for operators to climb ladders in bad weather, ice, etc. to manually check and record DP
  • ✔️ Better record-keeping

    • 🔵 The data is logged in the DustIQ dashboard for easy retrieval
  • ✔️ Real-time data and continuous monitoring

    • 🔵 Instead of one data point per day, which may vary based on the filter cleaning status, data can be logged up to every second, for better data integrity
  • ✔️ Rapid Deployment

    • 🔵 Unlike legacy “IoT” systems that required months of configuring and integration, the DustIQ platform can be deployed almost immediately with the cloud-based dashboard. Integration with existing SCADA or control systems can be added and expanded if desired by the customer.

Costs

The cost for implementing the DustIQ platform will typically be less than $25,000 to include hardware (sensors and gateway), software (DustIQ platform), and installation. This would include 10 or so sensors, so the price may be less for a smaller site with fewer sensors.

Sensors can be added for a few hundred dollars each. A single gateway is typically sufficient for an entire building or site.

Additional Opportunities

Once the DustIQ predictive maintenance operating system is in place, additional sensors can be added with very little effort. For instance, installing an NKE Watteco BoB sensor on fans and motors allows continuous vibration tracking, giving early insight into bearing wear or developing motor problems long before a breakdown occurs. Alerts and reminders work the same way they do with DP monitoring, keeping maintenance teams ahead of issues instead of scrambling after the fact.

Particulate sensors can be mounted on dust collector exhaust stacks to monitor emissions in real time, helping facilities catch broken or leaking filters before they trigger a compliance violation. Airflow and velocity sensors can measure dust and air movement through ductwork, making it possible to detect early signs of blockages. Indoor environmental sensors can monitor temperature, humidity, pressure, noise, and airborne particulate levels, offering better visibility into workplace conditions that fall under PM2.5 or safety requirements.

Eric Schummer, CEO of Senzary, often explains the value of this modular approach: “Once the platform is running, adding sensors is almost plug-and-play. You don’t need a big IT project every time you want more visibility. You just add a sensor and the system takes it from there.”

With this flexibility, it becomes easy to see how one platform can unify an entire facility into a practical version of a Smart Plant, cutting manual labor, preventing unplanned shutdowns, and reducing compliance risks across the board.


To learn more about how the DustIQ predictive maintenance operating system can be deployed at your facility, contact us now!

,

Using Vibration and Motor Data to Prevent Dust Collector Fan Failures

Using vibration and motor data to prevent dust collector fan failures is no longer a complicated or expensive process thanks to modern IoT sensor technology. Remote monitoring makes it possible to detect small changes in fan behavior long before they turn into breakdowns. According to Matt Coughlin, Owner of Baghouse.com, “We used to rely on gut feeling and periodic checks. Now we can see what’s happening with a fan in real time, even before the operators notice anything. It changes the way maintenance teams work.” With easy-to-install sensors and continuous data streaming, plants can finally stay ahead of problems instead of reacting to them after it is too late.

How Do Remote Sensors Work?

IoT sensor package that mounts easily onto a motor or fan housing using magnets
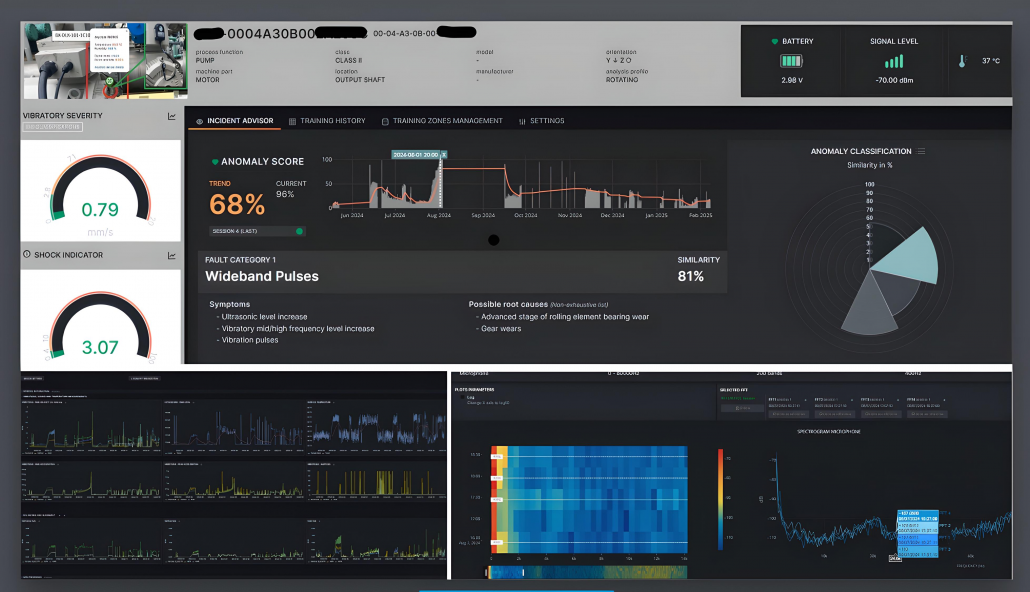
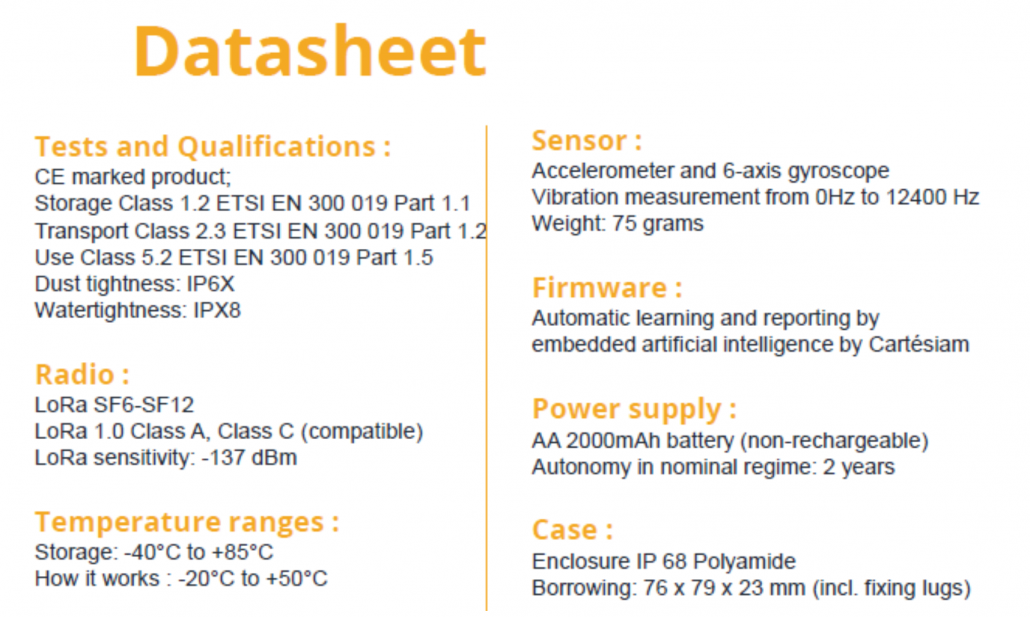
Remote IoT sensors attached to fan motors and rotating equipment continuously monitor parameters like vibration, acceleration, and temperature. Instead of periodic manual inspections, these sensors stream real-time data to a cloud platform. There, embedded analytics examine baseline behavior and flag subtle deviations, like early signs of misalignment, bearing wear, or imbalance. Once thresholds are crossed, the system sends an alert, giving maintenance teams time to intervene before a failure evolves. This predictive maintenance approach can dramatically reduce unplanned outages and extend the useful life of critical equipment.

IoT sensor package that mounts easily onto a motor or fan housing using magnets 
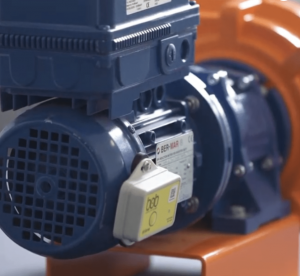
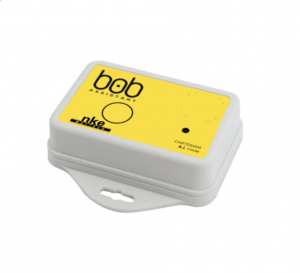
An example of this technology is an IoT sensor package that mounts easily onto a motor or fan housing using magnets… no cabling, no shutdown required. The sensor uses a tri-axis accelerometer to track vibration patterns, and an embedded temperature sensor monitors heat build-up. After a short learning period, the device recognizes the normal operating “signature” of the equipment. From that point onward, any abnormal vibration or temperature anomaly triggers a predictive alert.

IoT sensor package that mounts easily onto a motor or fan housing using magnets

IoT sensor package that mounts easily onto a motor or fan housing using magnets

For a dust collection system, this means you can monitor fan motors, blowers, and related equipment around the clock. Instead of relying on fixed maintenance intervals or waiting for a fan to show loud or obvious failure signs, remote IoT monitoring helps you catch bearing wear, imbalance, or loose components days or even weeks before anything goes wrong. This prevents catastrophic breakdowns, reduces emergency callouts, and keeps production running without surprises. Industry research continues to show that vibration-based condition monitoring is one of the most effective ways to cut unplanned downtime and maintenance costs. Matt Coughlin puts it simply: “You’d be amazed how many disasters start with a tiny vibration you can’t hear. When the sensors pick it up early, it’s like getting a heads-up before the problem even exists.”

Proactive Maintenance

Beyond preventing failures, this method gives you real operational intelligence. Built-in analytics transform vibration and temperature signals into clear information about machine health, remaining useful life, and the best moment to service equipment. Maintenance can finally be scheduled proactively, exactly when it’s needed instead of when the calendar says so. That means fewer unnecessary part replacements, fewer surprise interruptions, and much longer life for fans, motors, and the entire dust collection system.

Implementing remote IoT sensors is now easier than ever. Wireless sensors with battery operation and long-range protocols eliminate the need for complex wiring. Installation can often be performed in minutes with minimal disruption… even on running equipment! Data flows through gateways into secure, cloud-based dashboards accessible on desktop or mobile devices, giving maintenance teams real-time visibility from anywhere.


If you manage dust collection, plant maintenance, or facility operations, integrating vibration-based IoT monitoring into your maintenance strategy offers a practical path to safer, more reliable, and cost-effective operation.

, ,

Dust Control Strategies for Lithium-Ion Battery Manufacturing

electric car lithium battery manufacturing

The rapid growth of the electric vehicle (EV) industry and energy storage solutions has brought lithium-ion battery manufacturing into the spotlight.

The rapid growth of the electric vehicle (EV) industry and energy storage solutions has brought lithium-ion battery manufacturing into the spotlight. As production scales up, managing hazardous dust and fumes generated during manufacturing is critical for safety, quality, and environmental compliance. This article explores the intricate process of designing effective dust collection systems tailored for battery manufacturing, emphasizing best practices, challenges, and innovations to ensure a safe, compliant, and high-quality operation.

How Lithium-Ion Batteries Are Made: Step by Step

Thanks to their high energy density, rechargeability, and long lifespan, lithium-ion batteries power everything from smartphones to electric vehicles (EVs). But how exactly are they made before they end up inside your EV?

Let’s walk through the main stages of lithium-ion battery production, from raw material extraction to final quality testing.

Step 1: Raw Material Extraction and Preparation

lithium, graphite, cobalt, and manganese mine quarry for battery manufacturing

Critical materials for lithium-ion batteries include lithium, graphite, cobalt, and manganese.

Production begins with extracting key raw materials. According to the National Renewable Energy Laboratory, critical materials for lithium-ion batteries include lithium, graphite, cobalt, and manganese.

Inside the battery, these materials form the two main electrodes:

  • Anode: typically made from carbon-based materials such as graphite.
  • Cathode: composed of metal oxides containing lithium, cobalt, and manganese. These materials allow electric charge to flow between the electrodes during charging and discharging.

Step 2: Active Material Synthesis

Next, the extracted raw materials are refined and synthesized into active electrode materials with precise chemical and physical properties. This process often involves mixing, heating, cooling, and combining base metals with lithium, graphite, and binders. The goal is to create uniform, high-performance compounds for the anode and cathode.

Key minerals in an EV Battery

Step 3: Electrode Manufacturing

lithium electrode battery manufacturing
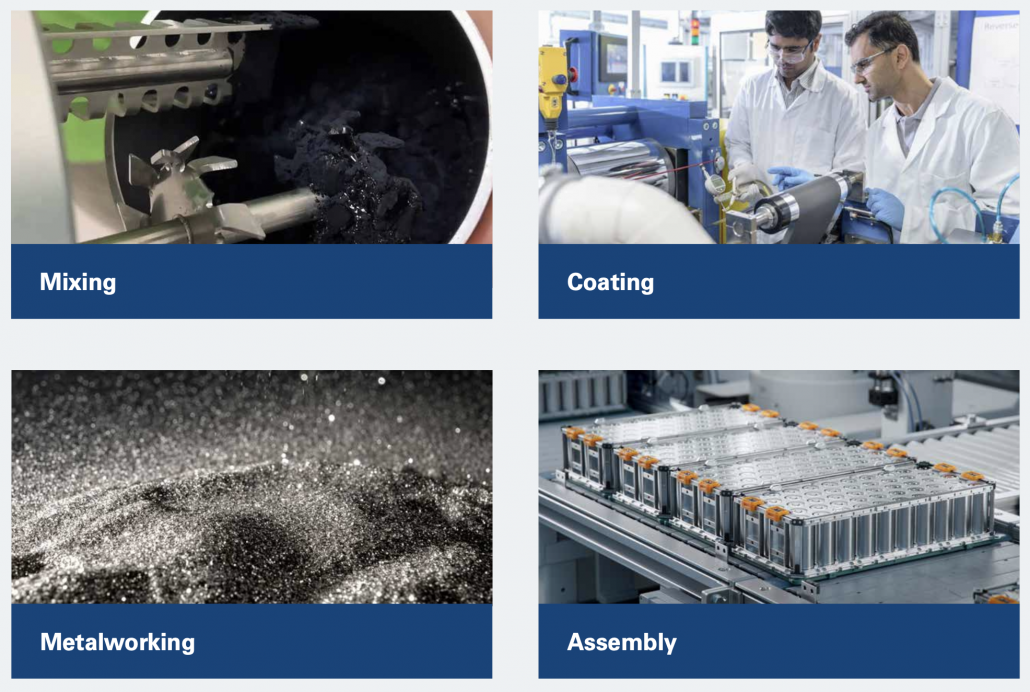
The electrode manufacturing stage includes three main steps: slurry preparation, coating and drying, and calendering. During slurry preparation, active materials are mixed with a solvent and binder to form a smooth paste. The slurry is coated onto thin metal foils (usually copper for the anode and aluminum for the cathode) and dried in a controlled environment to remove the solvent. Finally, the coated foils are compressed between rollers to reach the required thickness and density — a process known as calendering.

Dust in battery production tends to be dry, fine, and lightweight, often containing hazardous metals like cobalt, nickel, lithium compounds, and other reactive materials. Fumes can be flammable, needing strict fire safety measures. Areas such as slurry mixing, electrode coating, slitting, and cell assembly are hotspots for dust creation, with dust onset during material handling and processing steps. Both dust and fumes can contribute to combustible explosions and pose inhalation hazards, that’s why the need for specialized collection and filtration systems.

Step 4: Cell Assembly

Lithium-ion battery cells can take different forms: cylindrical, prismatic, or pouch cells. During assembly, anode and cathode sheets are stacked or wound together with a separator between them to prevent short circuits. Then, the cell is filled with electrolyte, which enables lithium ions to move between the electrodes. The cell is finally sealed to prevent leaks and contamination.

Step 5: Cell Formation and Aging

In this stage, cells undergo a series of controlled charging and discharging cycles. This activates the electrolyte and forms a solid electrolyte interphase (SEI) layer on the anode, which is essential for battery performance and durability. After formation, the cells are left to age and stabilize, ensuring consistent performance before further assembly.

Step 6: Module and Pack Assembly

Dust Control Strategies for Lithium-Ion Battery Manufacturing

Thanks to the high energy density of lithium-ion technology, manufacturers can design compact, powerful battery systems for a wide range of applications.

Individual cells are grouped into modules, and multiple modules form a battery pack. Each pack is equipped with a Battery Management System (BMS) that monitors voltage, temperature, and performance to maintain safety and efficiency. Thanks to the high energy density of lithium-ion technology, manufacturers can design compact, powerful battery systems for a wide range of applications.

Step 7: Quality Control and Testing

Finally, every lithium-ion battery goes through strict quality control and safety testing at multiple stages. This includes: Material inspections, in-line production checks, performance and capacity testing and electrical and safety evaluations.

These steps ensure each battery meets exact performance and safety standards before reaching the market.

Mixing, coating, metalworking and assembly process in battery manufacturing

Dust Collection System Design Principles for Battery Manufacturing

Effective dust collection hinges on a combination of properly designed hoods, ducts, fans, and filters:

  • ✔️ Hood Design: Capture hoods must be positioned close to emission points and designed to optimize airflow velocities (usually 150-200 ft/min for dust and fumes), minimizing both overshoot and energy consumption.
  • ✔️ Ducting Infrastructure: Size and slope ducts correctly to maintain minimum conveying velocities (commonly 4,000-4,500 ft/min for combustible dust) to prevent settling and blockages, avoiding turbulence and wear.
  • ✔️ Fans and Ventilation: Size fans based on total static pressure, including filters, ductwork, and hoods, ensuring reliable operation and energy efficiency.
  • ✔️ Filters and Dust Collectors: Cartridge collectors, especially models with nanoparticle filtration media, are ideal for capturing fine, dry dust without compromising airflow or adding excessive maintenance

Fire and Explosion Safety

Due to the combustible nature of many battery dusts, mitigation strategies such as system isolation (both mechanical and explosion venting), use of flame retardant filters, and chemical suppression systems are crucial. Conducting dust hazard analysis (DHA) determines fire/explosion risks and guides protective measures. The NFPA 660 standard provides guidance, but specific standards for battery manufacturing are evolving.

Preventive Maintenance and Monitoring

Modern systems incorporate electronic monitoring with smart sensors for filter differential pressure, fan operation, and alarm notifications. Bag-in, bag-out handling protocols prevent worker exposure to hazardous dust, and routine inspections help identify filter blockages or wear early.

Learning and Implementation Recommendations:

  • ✔️ Engage with experienced dust collection providers early in facility design.
  • ✔️ Conduct comprehensive dust hazard analyses to understand explosion and fire risks.
  • ✔️ Design for future scalability to adapt to technological changes.
  • ✔️ Prioritize worker safety through proper PPE, bag-in, bag-out protocols, and training. With these strategies, manufacturers can ensure a safer, cleaner, and more efficient production environment—driving the future of energy storage and electric mobility.


As explained, battery manufacturing involves multiple intricate steps, all processes which inherently generate fine dust and fumes. These airborne particulates, often combustible and hazardous, pose risks of explosions, fires, and long-term health effects for workers.

Companies like Baghouse.com bring decades of expertise in customizing solutions to meet these unique challenges, all with an emphasis on safety, regulatory compliance, and operational excellence. As battery manufacturing evolves, continuous innovation and adherence to best practices will be vital in safeguarding facilities and advancing sustainable energy solutions globally.

,

What Can You Do to Increase Your Baghouse Capacity?

Insufficient baghouse capacity is one of the most common problems our customers encounter. Some common indicators of insufficient capacity include high differential pressure and difficulty cleaning the dust collector. In many cases, a high pressure drop results in lost suction and reduced airflow throughout the system. Reduced suction and airflow mean that pickup points and collection hoods capture less dust at the source, allowing dust to settle and build up in the ductwork, which further reduces suction and airflow. Even if suction and airflow remain sufficient for the process, high differential pressure directly causes higher emission levels through the filter fabric and early bag failure due to increased airflow and more frequent cleaning.

Why Do Systems Lack Sufficient Capacity?

What Can You Do to Increase Your Baghouse Capacity?

There are several reasons why a dust collection system may be under capacity. One of the most common is that system processes are changed without regard for dust collector design. Even if a system was correctly sized and designed at installation, production increases later on may be made without considering how they affect baghouse operation.

In other cases, systems are undersized from the start due to poor project planning, weak engineering, or deliberate decisions by sales reps, OEMs, or management to undercut competitors with a lower-priced system.

If you are currently dealing with an undersized system, there are several proven ways to increase capacity.

Five Ways to Increase Baghouse Capacity

💡#1 — Convert to Pleated Baghouse Filters and Increase Airflow

  • Pleated filters design
  • Pleated filters can dramatically lower operating costs by increasing capacity, reducing emissions, and lowering electricity usage. These pleated filters improve on the design of traditional bags by packing more filter fabric into a smaller space, sometimes increasing the amount of filter media by as much as 700%.
  • They are more efficient at removing particulate than traditional bags and often last up to twice as long. Pleated filters are designed to meet today’s high production demands and can replace existing bags and cages in most standard pulse jet baghouses without any modifications required.
  • With the greater amount of filter media, operators can either:
    • ✅ Keep the airflow the same, which reduces the air-to-cloth ratio and improves performance and filter life.
    • ✅ Increase airflow to boost baghouse capacity, possibly allowing for the combination of several dust collection systems into one larger unit and in turn reducing operation costs.
  •  

💡#2 — Add Additional Modules

  • Adding a new dust collector moduleMost baghouse and cartridge collectors are designed with modular construction. That means the existing collector shell can be extended with one or more filter compartments. These new modules are bolted or welded onto the main collector housing and tied into the clean air plenum, hopper, and dust discharge system.
  • By doing so, you’re expanding the collector’s filter area, which directly lowers the air-to-cloth ratio (ACR). This allows the system to handle higher airflow without needing full replacement. This upgrade also reduces stress on fans and bags.
  • This is not necessarily an expensive upgrade. The biggest costs of a new system are the housing, hopper, support structure, fan, ductwork, and foundation. By adding modules, you’re keeping most of these in place. You’re only paying for the additional filter compartments, installation labor, and sometimes an upgraded fan if airflow requirements have increased.
  •  

💡#3 — Convert Older Shakers and Reverse Air Units to Pulse Jet Systems

  • Many older dust collectors, such as shakers and reverse air units, can be upgraded into modern pulse jet systems instead of being replaced outright. This conversion involves retrofitting the collector housing with new tube sheets, installing pulse-cleaned filter bags with cages, and adding a compressed air manifold and control system.
  • By doing so, you eliminate the need for mechanical shaking or continuous reverse airflow, which reduces moving parts, maintenance, and downtime. The result is a collector that can handle higher airflow at proper air-to-cloth ratios and provide much better cleaning while using the same basic housing and support structure. For plant managers, this is often a more economical and less disruptive option than buying a completely new system.

💡#4 — Install a Precleaner such as a Cyclone to Lessen Dust Loading

  • Cyclone separator upstream of a baghouse.

    Cyclone dust collector upstream of a baghouse dust collector.

    Installing a precleaner, such as a cyclone, ahead of a baghouse is a smart way to reduce dust loading. A cyclone removes a large portion of the heavier particles before they ever reach the filter bags, which means the baghouse only has to handle the fine dust.

  • This significantly reduces wear and tear on the bags, lowers the cleaning frequency, and helps maintain a lower pressure drop across the system. By easing the burden on the filters, you can run more airflow through the baghouse without overloading it, effectively gaining capacity without adding modules or replacing the unit.
  •  

💡#5 — Switch to Better Fabric Including PTFE Membrane

  • The microporous ePTFE structure shown here allows gases and vapors to pass while blocking liquids and particles.

    The microporous ePTFE structure shown here allows gases and vapors to pass while blocking liquids and particles.

    Upgrading to high-performance filter fabrics, such as those with a PTFE membrane, can immediately increase a baghouse’s effective capacity without changing its size. PTFE membranes act as a surface filter, preventing dust particles from penetrating deep into the fabric and forming heavy dust cakes.

  • This keeps airflow moving freely through the bags, lowers pressure drop, and reduces the frequency of cleaning cycles. With less resistance in the system, the same collector can handle more airflow while maintaining proper air-to-cloth ratios. Additionally, these fabrics are more resistant to moisture, temperature, and chemical attack, which means longer bag life and fewer shutdowns.


Every plant faces different challenges when it comes to dust collection, and there’s no “standard” solution for increasing baghouse capacity. The good news is you don’t have to figure it out alone. Our team has helped countless facilities determine the most cost-effective and reliable upgrades. If you’re struggling with high differential pressure, short bag life, or insufficient airflow, reach out to us today. We’ll review your system, discuss your production goals, and recommend the best path forward to maximize your dust collector’s performance while keeping costs under control.

, ,

Avoid Downtime By Taking Care of Your Baghouse Dust Collector

Downtime or lost production at a manufacturing facility can be incredibly costly.

Plants that operate 24/7 or produce large volumes of goods often know exactly how much each hour of downtime costs them—and it’s usually a number that makes management break into a cold sweat.

Problems with baghouses are a common cause of unplanned downtime, especially when maintenance is overlooked.

Problems with baghouses are a common cause of unplanned downtime, especially when maintenance is overlooked.

Problems with baghouses are a common cause of unplanned downtime, especially when maintenance is overlooked. Many facility managers think they’re saving money by cutting back on dust collection system maintenance. But what they’re really doing is saving a few pennies now only to lose buckets of dollars later when the whole system grinds to a halt.

It’s probably not realistic to expect any plant to run perfectly 24 hours a day, 7 days a week, 365 days a year. (If yours does, please tell us what’s the secret!) That’s why smart plant managers plan regular maintenance windows to keep things running smoothly.

There are two types of downtime: planned and unplanned. Both come with costs, but only one of them is on your schedule.

A survey of automotive industry execs showed that stopping production costs an average of $22,000 per minute. Let that sink in. Another study found that most facilities underestimate their downtime costs by a whopping 300%.

Now, imagine that your industrial dust collector goes down. Odds are, it won’t be going alone—it’ll take related systems with it. In many facilities, dust collectors used for pollution control are required to run at all times. Any malfunction can trigger a mandatory shutdown of the entire operation. When downtime costs tens of thousands per minute, it’s easy to see how skipping routine maintenance on a dust collector can quickly become the most expensive “savings” plan in history.

Yet despite their importance, dust collectors often get minimal attention when it comes to preventive maintenance.

Below are three practical tips to help keep your dust collector—and your production—running like clockwork.

1. Prevent Abrasion from Damaging Your Bags

Holes in a dust collector filter bag

High compressed air will lead to early bag failure, often creating abrasion problems or even creating holes in the fabric

Abrasion occurs when incoming dust hits the filters at high speed or volume. It can also happen when filter bags rub against each other or other components, like filter cages. This kind of wear is the main cause of early bag failure—and when bags leak, that usually means shutting the system down to find and replace them.

To reduce abrasion:

  • 🔸 Use baffle plates to slow down and evenly distribute incoming air, allowing heavier dust to fall out before reaching the filters.
  • 🔸 Ensure a proper inlet design to keep air from blasting directly onto the bags.
  • pleated filter graphic

    Pleated filter elements have many folds of the fabric that provide a greater surface area of filter cloth in a shorter length, allowing for improved air-to-cloth ratios in the same space

    🔸 Consider pleated filter technology, which elevates the filters out of the direct path of incoming dust. This gives particles more space to settle before hitting the filter media.

2. Change the Whole Set—Avoid Spot Changing

One of the most common (and most shortsighted) maintenance mistakes is only replacing the individual filters that fail, instead of the entire set. While it might seem like a cost-saving measure, it actually leads to more frequent failures, more emissions, and more downtime—not exactly a win.

Here’s why: when a brand-new filter is installed among older, dust-laden ones, air naturally flows through it more easily. That extra airflow causes the new filter—and those around it—to wear out faster. It’s a domino effect of failure.

Pro tip: If you’ve spot-changed more than 5–10% of the filters in a unit, it’s time to replace the entire set. That prevents the cycle of failure from continuing and helps restore optimal system performance.

3. Use Triboelectric Monitoring

Triboelectric leak detector

With devices such as opacity meters or triboelectric bag leak detection systems, plants can measure emissions with extreme accuracy

Want to catch bag failures before they catch you off guard? Install a triboelectric monitor. It’s one of the best tools to proactively detect early or end-of-life filter failures.

With a properly installed system, you’ll get an alert at the first signs of a leak, early enough to address it during your next scheduled maintenance window. That means fewer emergency shutdowns and less contamination of nearby filters.

And when a leak does occur, triboelectric monitoring systems can help you pinpoint its exact location, right down to the compartment, row, or even individual bag. Quite impressive, right?

Conclusion

Regular maintenance and smart monitoring of your baghouse dust collector can help you avoid unplanned downtime, reduce emissions, and keep your team focused on production, not chasing leaks. In the end, it’s not just about dust—it’s about dollars.

,

The Role of Dampers and VFDs in an Efficient Dust Collection System

Every time we visit a new plant and chat with the folks running the dust collectors, we notice that the word “damper” means different things to different people. So we figured it’s a good time to clear things up and explain what dampers actually are, what are VFDs, and how to use them the right way.

What Are Dampers?

As systems increase in size, it may be necessary to use dampers on the ductwork.

As systems increase in size, it may be necessary to use dampers on the ductwork

Ventilation dampers are used in dust collection systems to adjust and control airflow. Air dampers are also used to separate sections of the ductwork that are not currently operated, thus optimizing the operation of the entire system. There are different types of dampers, including manual dampers (adjusted by hand), motorized dampers (controlled by an electric motor), and automatic dampers (responding to changes in temperature or pressure). Dampers provide a way to manually or automatically adjust airflow, but they do not change the speed of the fan or motor.

In the dust collector itself, there are two main types of dampers and they adjust fan capacity with different system effects:

  1. Outlet Damper: This is the least efficient option, as it increases system pressure drop as the air flow decreases.

    Outlet Damper: This is the least efficient option, as it increases system pressure drop as the air flow decreases.

    Inlet Vane Damper (VIV) – Installed on the inlet of the fan, swirls the air in the same direction as the fan rotation. They are commonly modulated with electric or pneumatic actuators. This is the most efficient damper option. Power consumption can be reduced, though not as much as with a VFD.

  2. Outlet Damper – Mounted on the outlet of the fan, simply “throttles” the air leaving the fan. This damper is the least efficient option, as it increases system pressure drop as the airflow decreases.

The Importance of Initial Damper Settings

You might have to readjust the dampers throughout the lifespan of the filters

You might have to readjust the dampers throughout the lifespan of the filters

When a dust collector is first commissioned, a service technician measures the total air volume and duct conveying velocity to ensure proper dust control at the hoods in the process. These measurements are typically taken when the system and filters are new, with a low differential pressure around 1.0 inch of water column. At this point, the technician sets and records the fan damper position.

Most dust collectors have a cleaning system that keeps dust from building up in the filters and helps maintain an average differential pressure. But as time goes on, pressure builds up and airflow drops, so you might have to readjust the damper a bit to keep things working right. This kind of adjustment might need to happen a few times throughout the lifespan of the filters.

When it’s time to replace the filters, the damper must be readjusted to its original position set during commissioning. If you skip that step, you could end up with too much airflow, which wears out the new filters faster, increases costs due to more frequent replacements, and could even cause some downtime in your process.

What is the difference between Dampers and VFDs?

While dampers control airflow by opening or closing to adjust the volume of air passing through ducts, VFDs control the speed of motors to regulate the output of fans. 

VFDs (Variable Frequency Drives) are electronic devices used to control the speed of an electric motor by varying the frequency and voltage supplied to it. They are often used with fans to adjust the speed of the motor based on the required airflow. By adjusting the speed of the motor, VFDs can achieve energy savings by matching the output of the fan or pump to the actual demand, rather than running at full speed constantly.

The VFD can sense this decrease in flow via a pressure transducer located in the dirty air inlet duct. The VFD will automatically increase the speed of the fan and return the system to the optimal operating point of flow and air to cloth ratio.

This setup is great for dust collector users because it cuts down on the work needed to keep the system running—no one has to constantly mess with the outlet damper. Plus, the VFD keeps the collector working at the right air-to-cloth ratio all the time. That means there’s no risk of someone accidentally opening the damper too much and throwing things off, which can wear out the filters faster.

But the biggest perk for dust collector owners? Long-term energy savings. Since fans use variable torque, the energy they need depends on how fast they’re running. And it’s not a small difference—if you slow a fan down by 25%, it only uses about 42% of the energy. Cut the speed in half, and it only uses around 12% of the power. That adds up to serious savings over time.

Do I Need a Fan Damper or a VFD?

Simply put, it all depends on the application. What can help you decide?

PROS

In addition to reducing the power, variable frequency drives in fan applications may also result in reduced noise in heating and ventilation ductwork due to the elimination of dampers. When regulating flow rates, dampers can induce unwanted vortexes in the airflow, which create noise and vibration. In a variable frequency drive system, making flow-rate changes generally only results in slight changes to the noise levels, which are normally undetectable to the ear.

The energy fan needs depends on how fast they run. If you slow a fan down by 25%, it only uses about 42% of the energy. That adds up to serious savings over time.
The energy a fan needs depends on how fast they run. If you slow a fan down by 25%, it only uses about 42% of the energy. That adds up to serious savings over time.

CONS

  • ✳️ Full load conditions: in well-optimized applications where the process demand may already closely match the full-load capacity of the motor, then use of a variable frequency drive with its associated energy losses would only add to the overall system losses.
  •  
  • ✳️ Equipment speed limitations: some equipment is not designed to operate at reduced speeds, and could be damaged if operated at a reduced speed. Check with equipment suppliers to ensure the equipment is compatible with variable speed operation.
  •  
  • ✳️  Another limitation of variable frequency drives is that it is not normally possible to reduce the flow all the way to zero due to a reduction of cooling capacity in the motor; a minimum speed of around 30% is permissible, however this is dependent on the specification of the variable frequency drive and motor.

Which One is the Most Convenient for My System?

Here we have some key factors you should have in mind:

  • ✔ How many hours will the fan be in operation?
  • ✔ What is the cost of power in your area?
  • ✔ Dampers have lower up-front costs than VFD’s, but VFD’s can provide higher long-term savings in energy costs.
  • ✔ Outlet dampers may be a great option if cold-starting the fan is the only concern (when the air’s temperature at start-up is colder than the actual operating temperature).
  • ✔ Dampers can be used to regulate and balance system pressure.

Do you have any additional questions regarding fan dampers and VFD’s? Are you wondering how you can make the switch in your current dust collection system?

, , ,

Are My Dust Collector Filters Washable?

—”The inside of my dust collector’s filter bag is clogged with a solid layer of dust, and the airflow seems weaker than before. Should I hire a filter cleaning service? Isn’t that cheaper?”

Short answer: “Maybe not…”.

Long answer: Read below!

Pros and Cons of Wet and Dry Cleaning Services For Filters

Cleaned filters need to be replaced more frequently, leading to more change-outs, downtime, and cleaning charges.

Cleaning weakens the filter, reducing its strength, lifespan, and risking structural failure

Many see paying for a wet or dry cleaning service for their cartridge and bag filters as a great deal. But is it really? 

The cost of having a filter cleaned is significantly lower than buying a new one. However, the perceived savings quickly diminish when you factor in the resulting shorter filter lifespan and decreased efficiency caused by cleaning.

Cleaned filters need to be replaced more frequently, leading to more change-outs, downtime, and cleaning charges.

Usually, a cleaned filter lasts about half as long as new filters before clogging again. Consequently, cleaned filters require more frequent replacement, resulting in increased change-outs, downtime, and cleaning expenses.

In the following images, you can see the true difference between new filters and filters after it has been wet cleaned or dry cleaned.

The true difference between new filters and filters after it has been wet cleaned or dry cleaned.
Image comparisons of New, Wet Cleaned, and Dry Cleaned Filters

As shown in the images, cleaned filters still retain particles. Independent lab tests comparing new and cleaned filter media revealed the following:

  • ● Cleaning weakens the filter, reducing its strength, lifespan, and risking structural failure.
  • ● It can damage filter pores.
  • ● The nanofiber surface layer degrades, reducing efficiency at the submicron level by up to 18%.
  • ● Only about 52.8% of the filter’s overall dust holding ability is recovered, using up over half of its lifespan.
  • ● Wet cleaning may remove flame retardant treatment.
  • ● Aggressive cleaning can cause weak spots or holes in filters.
Wet cleaning on dust collection filters can remove flame retardant treatment.

Wet cleaning can remove flame retardant treatment

Apart from these reasons, consider disposable safety equipment, travel time for service personnel, or downtime costs, which can be double the cost of new filters.

By the end of the year, this average scenario shows that it is actually more expensive to use cleaned filters than new filters. Why spend more money just to compromise the integrity of your dust collection system? 


Additional Factors to Consider

  • ● Turnaround time for cleaning can be two to three weeks.
  • ● You need to keep spare filters and packaging available while filters are being cleaned.
  • ● Shipping and handling increase the risk of filter damage.
  • ● Cross-contamination and receiving back another customer’s filter are possibilities.
  • ● Contaminants can migrate during cleaning, introducing them into the plant environment.
Dry-cleaned filters lose almost 53% of their original dust loading capacity.

Dry-cleaned filters lose almost 53% of their original dust loading capacity

"We thought we could save a bit of money by washing our filters instead of replacing them. I figured it was worth a try. Initially, everything seemed fine — they looked cleaner, and airflow improved. But just a few days later, we noticed the collector wasn’t performing like it used to. The differential pressure started rising and not coming down after the cleaning pulse, and we had buildup inside and outside our facilities. It wasn't a good idea. The filters started clogging up much faster than before, and we had to replace them anyway.

In the end, we lost valuable production time and the costs added up quickly. Looking back, I would have been better off sticking with new filters and avoiding the headaches altogether."

So... Should I Wash My Dust Collector Filters?


If you’re debating whether to clean or replace your dust collector filter, the answer is to replace it.

Filters should always be changed when they become blinded and the differential pressure gets consistently high. This is especially important even if the filter media looks undamaged. Materials like polyester, cellulose, or corrugated filters aren’t built for high-pressure cleaning — attempting to do so can cause holes or tears that may be too small to see but will still allow dust particles to pass through the filter. These particles can accumulate in the clean air plenum and continue blowing into your facility, even if the filters seem “clean.”

While a clean filter and a seemingly normal differential pressure reading might suggest everything is working properly, the truth is that the lower dP could be misleading — a result of contaminated air passing through tiny holes created by repeated cleaning.

Our advice: Think twice before cleaning your dust collector filters. What seems like a good deal may not be in the long run.

If your filters are blinded and you are ready for your next filter changeout, click here:

, ,

Why Set Cleaning Based on Differential Pressure Instead of a Timer Setting?

Dust collector operators typically utilize cleaning systems to help them ensure effective dust control for their process areas while saving compressed air (which is very expensive when you look at your electric bill). And, for as much as some consider that the cleaner the filter is, the better it works, that is not always the case. Although some will suggest cleaning the bags on a regular basis using a timer setting… in this article you will learn why setting up your cleaning system based on the differential pressure is better for you.

In order to understand all the reasons, let’s start with the cleaning basics.

What is Pulse Jet Cleaning?

Graphic showing compressed air dislodging the dust cake from the filters

During pulse jet cleaning, a reverse flow of clean compressed air puffs a row of bags outwards, dislodging the dust cake on each bag’s surface. The bags react to the initial shock of compressed air, followed by a bubble-like expansion that moves along the bag length.

During pulse jet cleaning, a reverse flow of clean compressed air puffs a row of bags outwards, dislodging the dust cake on each bag’s surface. During this cleaning cycle, the bags in the row being pulsed do not inflate all at once, but in a wavelike manner, which enhances cleaning. The bags react to the initial shock of compressed air, followed by a bubble-like expansion that moves along the bag length. During the cleaning procedure, the baghouse remains online, and filtration continues, with no downtime required.

What is Differential Pressure?

Diagram of a pulse jet system

During pulse jet cleaning, the compressed air accumulated in the air header reaches the blowpipe with a frequency and strength determined by the controller, the gauge and the diaphragm

Differential pressure in a dust collector is the difference in air pressure between the dirty side of the collector and the clean side (these two sides divided by the tubesheet). When dust particles are collected by the filter, they build up on the filter surface, making it harder for air to pass through. This creates a pressure difference: the air inside the filter becomes more pressurized compared to the clean air outside the filter.

As the dust builds up, the pressure difference increases, which can affect the efficiency of the dust collector. High differential pressure usually means the filter is getting clogged and needs cleaning. Monitoring differential pressure helps ensure the dust collector is working properly and efficiently.

Why is It Important to Monitor Differential Pressure?

Differential Pressure gauges

Just as blood pressure indicates the health and efficiency of the circulatory system, differential pressure provides a vital measurement of how well the dust collector is functioning.

Differential pressure can warn us when the baghouse needs help. It can be as simple as indicating when it’s time to pulse clean filters or more extensive service, like it’s time to replace the filters. Continuously monitoring pressure drop can reveal problems early, when they are faster, easier and cheaper to fix, and helps extend bag life.

Why Set Cleaning Based on Differential Pressure Instead of a Timer?

Setting your cleaning based on differential pressure helps stop wasting compressed air. This is because the filters are cleaned only when the pressure reaches a certain level, which prevents overuse. It’s important to maintain the right amount of dust cake (the layer of dust on the filter) because cleaning too often or not enough can cause problems. Under-cleaning creates high differential pressure, while over-cleaning wears the filters out faster.

DID YOU KNOW?
The primary benefit of differential pressure controllers is their ability to program a high set point (when a filter cleaning system turns on) and a low set point (when the cleaning system turns off). Usually the low and high points for the differential pressure are 3” to 5” respectively. By programming the high and low set points effectively, the controller triggers filter cleaning only within the desired range.

During normal use and operation, these controllers monitor the differential pressure across the filters in the collector. The dust collector operator receives a visual indication of the pressure drop across the filters, indicating how clean or dirty the filters may be. Typically, the lower the indicator value for pressure drop, the cleaner the filters, and the higher the value, the dirtier the filters.

Dirty filters tend to provide better filtration efficiency with their cake of accumulated dust, but they require additional energy from the fan in order to maintain airflow volume.

In summary: Your dust collector’s cleaning system does not need to run continuously or clean in fixed periods of time. Using the differential pressure to control the cleaning will save you lots of money and time, since the system will only clean when is necessary, and your filters will last longer.

How Often Should We Monitor the Differential Pressure?

A good preventive maintenance program should include daily (or per shift) checks of the filter differential pressure on each pulse jet unit. This includes visually inspecting and listening to each collector while it’s running to check the pulsing sound and frequency, as well as checking the compressed air pressure in the cleaning manifold before and after pulses. Weekly, monthly, and longer-term checks should also be included. A simple and effective way to do this is to assign one person per shift to monitor the dust collectors and record that information. After a short time, they will become familiar with the normal differential pressure trends and sounds, helping them quickly identify any issues.


What Are The Best Settings For Your Pulse Cleaning System?

  1. Pulse Duration

   It’s important to set your pulse time correctly. We recommend a pulse duration between 300 and 500 milliseconds. This is enough time to allow a solid “pop” of air, without an additional “Shhhh” with it. This provides a strong burst of air, without wasting air with additional unnecessary flow. A pulse that lasts too long results in wasted air after the initial “pop,” as the lower pressure doesn’t improve cleaning. If pulses are too short, they might not clean the filters thoroughly, leading to premature wear. You can adjust pulse duration on the timer board or controller.

  1. Pulse Frequency 

   The key to effective pulsing is giving the manifold enough time to recover the compressed air between pulses. Avoid pulsing too frequently, as this can prevent the manifold from refilling to the correct pressure. If the pressure isn’t high enough, cleaning will be inefficient, leading to wasted compressed air. Always ensure there’s enough delay between pulses to allow the manifold to recover properly. This can also be set on the timer board or controller.

  1. Pulse Sequence 

   It might seem logical to pulse the filters in row order, but this actually wastes air. When row 1 is cleaned, its lower static pressure allows air to take the path of least resistance, potentially carrying dust back into row 1 during subsequent pulses. This reduces the effectiveness of the cleaning. Instead, we recommend pulsing in a non-sequential order. For example, pulse rows 1, 4, 7, and 10 first, then rows 2, 5, 8, and 3, 6, 9, repeating. This method ensures better cleaning and minimizes air waste. You can change the sequence by adjusting the wiring on the timer board.

By following these guidelines, you can improve the efficiency of your dust collection system, saving both time and money.


Do you have any additional questions? 

,

Should I Buy a Used or New Baghouse?

Key Considerations for Buying Used Baghouse Systems

Key Considerations for Buying Used Baghouse Systems

When businesses look for ways to save money, one option is to buy used equipment instead of new. At first glance, purchasing a used baghouse system may seem like a great deal. The lower upfront cost and quick availability are tempting. However, before jumping into a decision, it’s important to consider more than just the initial savings. There are hidden factors that could make a used baghouse less economical in the long run. Let’s break down the pros and cons to help you make the best decision for your operation.

Key Considerations for Used Baghouse Systems

While a used baghouse may come with a lower price tag, here are a few critical factors you need to evaluate:

  1. Age and Condition

    How old is the equipment? It’s common for used systems to need replacement parts such as filters, cages, valves, and gaskets. Depending on how much needs to be replaced, a used system could quickly become more expensive than it first appeared.

  2. Compatibility with Your Needs

    Is the system designed for your specific dust collection requirements? Consider:

    • The air-to-cloth ratio
    • The temperature and pressure it can handle
    • The physical and chemical properties of the dust. An improper match could lead to inefficiencies, higher operating costs, or worse—contamination risks.
  3. Unknown History

    Before buying a used dust collector, make sure you get a full report of what kind of process it was used for

    Before buying a used dust collector, make sure you get a full report of what kind of process it was used for

    You might not know what the baghouse was exposed to before. If it handled hazardous or incompatible materials, you could face contamination risks in your own operations, which could harm your products or create a dangerous environment.

  4. Compliance

    Does the used system meet today’s OSHA and NFPA standards? Regulations are frequently updated, and an older system might need costly upgrades to comply with current rules.

  5. Transport and Assembly Costs

    Large used baghouse systems may need to be disassembled for transport, which can require specialized equipment and labor. Reassembling it at your site could also incur additional costs, potentially outweighing the initial savings.

Hidden Costs to Watch For

Used systems often come with more than just the visible costs of parts and transport. You might also encounter:

  • — Structural issues: Outdated control systems or worn-out motors could add to your expenses.
  • — Environmental concerns: Older systems may not include modern technology for efficient dust collection or emission control.
  • — Higher maintenance: Older systems generally require more frequent repairs and servicing, which increases downtime and operational costs over time.

Benefits of Buying a New Baghouse System

Baghouse.com personnel unloading a dust collector and installing it

A new system offers customization, compliance, low maintenance, and the security of a warranty

While buying a used baghouse system may seem cheaper upfront, purchasing new equipment often saves more in the long run. Here’s why:

  1. Customization: A new system is designed specifically for your operation. Experts take into account the dust properties, airflow needs, temperature, and pressure to create a system that runs efficiently and meets all your requirements.
  2. Compliance and Safety: A new system will meet current OSHA and NFPA regulations right from the start. This helps you avoid fines, legal issues, and costly modifications.
  3. Lower Maintenance Costs: New systems are less likely to break down and come with modern cleaning mechanisms that extend filter life and reduce operating costs.
  4. Warranty and Support: A new baghouse comes with a warranty and the option for ongoing technical support, giving you peace of mind that any issues will be promptly handled.
  5. Higher Resale Value: A new system, when well-maintained, will retain more of its value, making it easier to resell if your production needs change.

Conclusion: Used vs. New—Which is Right for You?

If you’ve evaluated a used baghouse system and determined it can meet your needs, considering factors like disassembly, transport, and the cost of necessary upgrades, it might be a good option. However, keep in mind the potential hidden costs and long-term maintenance issues.

On the other hand, a new system offers customization, compliance, low maintenance, and the security of a warranty, which often makes it a better investment over time.


Before making your decision, we recommend speaking with a dust collection expert at Baghouse.com. Our specialists can help analyze your specific needs and guide you toward the best option for your facility.

,

Case Study – Operational Improvements at Blue Diamond Growers

Background

Blue Diamond Growers facilities in Central California
Blue Diamond Growers is an agricultural cooperative that specializes in California almonds. Founded in 1910, is the world's largest tree nut processing and marketing company.

Blue Diamond Growers, an almond processing facility in central California, required a large and complex ductwork modification and installation of HEPA filters on several dust collection systems  to balance building pressure and improve air quality. The project involved routing return air from their dust collectors back into the building and installing high-efficiency HEPA filters to ensure the return air was dust-free. Additionally, the added HEPA filters required existing dirty air ductwork to be rerouted around the new equipment.

Scope of Work

Blue Diamond Growers needed to balance pressure within their facility to reduce energy costs and maintain air quality. This required significant re-routing of ductwork, designing custom HEPA housings, and transitions. They also needed to install particulate sensors and differential pressure gauges with remote monitoring capability.

Solution

Baghouse.com responded to a request for a quote and developed the final work scope after a job walk and reviewing 3D scans of the facility. The engineering deliverables included 2D layouts, 3D CAD files of the dust collection systems, and general arrangement drawings of the equipment.

3D design of a dust collector and the ductwork
The engineering deliverables included 2D layouts, 3D CAD files of the dust collection systems, and general arrangement drawings of the equipment.

3D drawing of the ductwork installed in Blue Diamond Growers
Re-routing the ductwork and designing custom HEPA housings helped to balance pressure within their facility to reduce energy costs and maintain air quality.

Installation Challenges

The project had to be completed within an extremely tight schedule, as the customer could only take their production offline for one week. The existing ductwork’s complexity, with many tight clearances and multiple duct sizes and inlets, posed a challenge. The ductwork had to be re-routed around the new HEPA filter housings logically to minimize static pressure from added elbows and unions.

Outcome

The project was completed within about four months, resulting in a perfectly balanced facility for the first time. Blue Diamond Growers significantly reduced their energy usage, is able to keep their climate-controlled and refrigerated areas cool, and has significantly minimized the risk of pulling in outside dust or contaminants. The upgrade also reduced the overall heating and cooling costs in the facility.

Conclusion

Baghouse.com provided Blue Diamond Growers with a comprehensive solution that improved air quality and facility efficiency. The successful implementation of the dust collection upgrade has led to significant energy savings and operational improvements.


Would you like to know how a technical inspection and a system report by Baghouse.com could improve the efficiency of your operations? 

Talk now with one of our baghouse experts for more information!